Today I’m going to make a tutorial for everyone’s desktop. It’s a Retro wallpaper design.
We have to make a vision of every design
before designing, and we have to have a simple and straight concept in
mind which uses low resources for extraordinary outcome. In this
tutorial I use most likely simple tools and make an amazing and colorful
wallpaper.
Let’s take a look on the tutorial, hope you all learn a lot.
<blockquote>Before we go further remember to Subscribe to our Free Rss Feed or Follow us on
  Twitter to stay updated with our postings</blockquote>
Final Result


[Download PSD]
Elements We Will Use
Background
First thing first, take a blank layer.

Add this color.

Here I take a custom shape from the default custom shapes available in Photoshop. We used this shape as a background.

We are done with the drawing (for now). We first Rasterize the layer and then crop it off to give it a cubical shape.

Here I apply this gradient on the background layer with the following colors.

Draw a shape with the Marquee Tool and select the Add Value from the property bar in order to make clouds.

We are done with the adding and we have to fill it with the black and
white colors on the new layer and change the layer style to the
overlay. You will see the final result after a few steps.

Road
I made a new layer for the road and filled it with this color.

Here I am giving a texture to the road from the pattern overlay.

I drew some shapes for making the road stripes, After drawing the stripes we merged the layers into one called Road.

Let’s Merge!
I transformed the road to make it look like vanishing into the
Horizon in the background. The tool for this can be reached by going to
the Edit>Transform>Perspective and press the top left and top right anchor points of the layer inwards. You can also see the results of the clouds we made.

Here I also use the perspective tool on the car for making the effect
more realistic, but this time we stretch the points to outside.

Same step again on the other car.

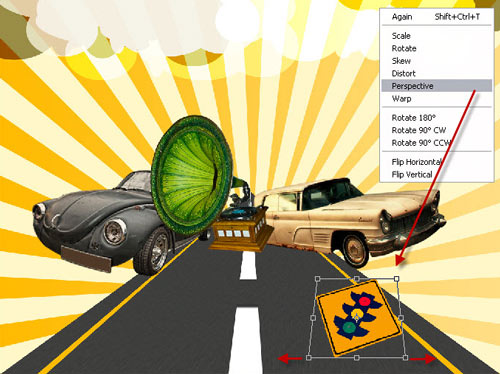
Here I place the Gramophone in the middle of the cars. This doesn’t make much sense but looks good nevertheless.

I took a road sign and put it on the road, and going again to the
perspective tool to adjust the perspective according to the scene.


Detailing
It’s time for some realistic touch – I’m going to make the board more
vivid by adding the spots of dust on it. I used Brush Tool , Appended Faux Media Brushes and then selected the brush you can see in the figure below.

Here I used some Hand Drawn Buildings for the retro effect and making the background Transparent.

Now let’s use the bird brushes from the Free Bird Brush Set
and we added the parachute which I made with the help of pen tool. You
can find the vectors of the parachute in the Downloadable PSD file. You
find the download link in the end of this tutorial. I adjusted the
buildings by rotating or transforming.

I copied the White cloud on the new layer and transformed the cars on
the road for making the glowing effect. I changed it’s layer style to
the Overlay which is very important but not much visible in the wallpaper, yet this shine plays an important role in the graphic.

I selected the Erase Tool and then the following brush tip with same
settings we used earlier and erased from the cloud layer ‘s specific
areas. I then copied the erased layer, changed its color to Black and placed it under the cars for black shine.

Last step is to a plane in the scene, make the background transparent and place it in front of the clouds.

Final Result


[Download PSD]
We have to make a vision of every design
before designing, and we have to have a simple and straight concept in
mind which uses low resources for extraordinary outcome. In this
tutorial I use most likely simple tools and make an amazing and colorful
wallpaper.
Let’s take a look on the tutorial, hope you all learn a lot.
<blockquote>Before we go further remember to Subscribe to our
Final Result

[Download PSD]
Elements We Will Use
Background
First thing first, take a blank layer.

Add this color.

Here I take a custom shape from the default custom shapes available in Photoshop. We used this shape as a background.

We are done with the drawing (for now). We first Rasterize the layer and then crop it off to give it a cubical shape.

Here I apply this gradient on the background layer with the following colors.

Draw a shape with the Marquee Tool and select the Add Value from the property bar in order to make clouds.

We are done with the adding and we have to fill it with the black and
white colors on the new layer and change the layer style to the
overlay. You will see the final result after a few steps.

Road
I made a new layer for the road and filled it with this color.

Here I am giving a texture to the road from the pattern overlay.

I drew some shapes for making the road stripes, After drawing the stripes we merged the layers into one called Road.

Let’s Merge!
I transformed the road to make it look like vanishing into the
Horizon in the background. The tool for this can be reached by going to
the Edit>Transform>Perspective and press the top left and top right anchor points of the layer inwards. You can also see the results of the clouds we made.

Here I also use the perspective tool on the car for making the effect
more realistic, but this time we stretch the points to outside.

Same step again on the other car.

Here I place the Gramophone in the middle of the cars. This doesn’t make much sense but looks good nevertheless.

I took a road sign and put it on the road, and going again to the
perspective tool to adjust the perspective according to the scene.


Detailing
It’s time for some realistic touch – I’m going to make the board more
vivid by adding the spots of dust on it. I used Brush Tool , Appended Faux Media Brushes and then selected the brush you can see in the figure below.

Here I used some Hand Drawn Buildings for the retro effect and making the background Transparent.

Now let’s use the bird brushes from the Free Bird Brush Set
and we added the parachute which I made with the help of pen tool. You
can find the vectors of the parachute in the Downloadable PSD file. You
find the download link in the end of this tutorial. I adjusted the
buildings by rotating or transforming.

I copied the White cloud on the new layer and transformed the cars on
the road for making the glowing effect. I changed it’s layer style to
the Overlay which is very important but not much visible in the wallpaper, yet this shine plays an important role in the graphic.

I selected the Erase Tool and then the following brush tip with same
settings we used earlier and erased from the cloud layer ‘s specific
areas. I then copied the erased layer, changed its color to Black and placed it under the cars for black shine.

Last step is to a plane in the scene, make the background transparent and place it in front of the clouds.

Final Result

[Download PSD]

